
Introduction
What is restic?
restic is a backup utility written entirely in go. restic is a robust backup solution, known for it’s reliability. It supports remote incremental backups to SFTP, Amazon S3, Google Cloud Storage, Microsoft Azure and many other services. restic encrypts backups on the fly.
What are the requirements?
Today we’ll be setting up restic in a linux environment – Ubuntu 14 in particular. But in reality you can utilize restic on any platform that is capable of running go since it is cross platform compatible.
- A Google Drive account, preferably with unlimited storage for best results.
- google-drive-ocamlfuse is required to mount your Google Drive in Ubuntu.
Configuration
Set up Google Drive mount
We start by installing google-drive-ocamlfuse to set up our mount so restic has a location to store backups.
sudo add-apt-repository ppa:alessandro-strada/ppa
sudo apt-get update
sudo apt-get install google-drive-ocamlfuse
If you receive the error -bash: add-apt-repository: command not found, you will need to install the below package.
sudo apt-get install software-properties-commonOnce installed, run google-drive-ocamlfuse without any arguments to create the required directories.
sudo google-drive-ocamlfuseNext, create the mount folder for our Google Drive.
sudo mkdir /mnt/gdriveNow we need to add configure the Google Drive id and secret key. Please follow these instructions if you do not already have your id and secret key.
We use the -headless argument since we are configuring directly via SSH. It’s also a good idea to -label your mount – In this case we name it “gdrive”.
sudo google-drive-ocamlfuse -headless -label gdrive -id <your_id> -secret <your_secret> /mnt/gdrive/resticYou will be asked to open a link in your browser which will essentially allow google-drive-ocamlfuse to access your Google Drive.
Once you have entered your verification token, your Google Drive is mounted as a drive and we can proceed with setting up restic.
Install and configure restic
Now, let’s install restic. The latest version at the time of writing this tutorial is 0.9.1.
wget https://github.com/restic/restic/releases/download/v0.9.1/restic_0.9.1_linux_amd64.bz2
bunzip2 restic*
sudo cp restic* /usr/local/bin/restic
sudo chmod a+x /usr/local/bin/restic
restic requires a repository before it can start backing up – In this case we will be creating a repository in our Google Drive. The repository represents the place it stores backups/snapshots.
sudo restic init --repo /mnt/gdrive/resticYou will be asked to set a password for the repository. This is the RESTIC_PASSWORD mentioned below. Keep it safe! Without it, you cannot access your backups.
Since we want to perform fully automated backups, restic needs two environment variables. Add these at the bottom of /etc/profile.
Alternatively, you can add these at the top of your backup shell script (example script is at the bottom of this tutorial).
export RESTIC_REPOSITORY=/mnt/gdrive/resticexport RESTIC_PASSWORD=<your_password>Backing up
We’re ready to run our first backup! I have chosen to backup my /home, /var/www and /root directories.
sudo restic -r $RESTIC_REPOSITORY backup /home /var/www /rootrestic will open the repository with the password we created from our /etc/profile and start the backup.
To see your backups/snapshots, run the below command.
sudo restic -r $RESTIC_REPOSITORY snapshots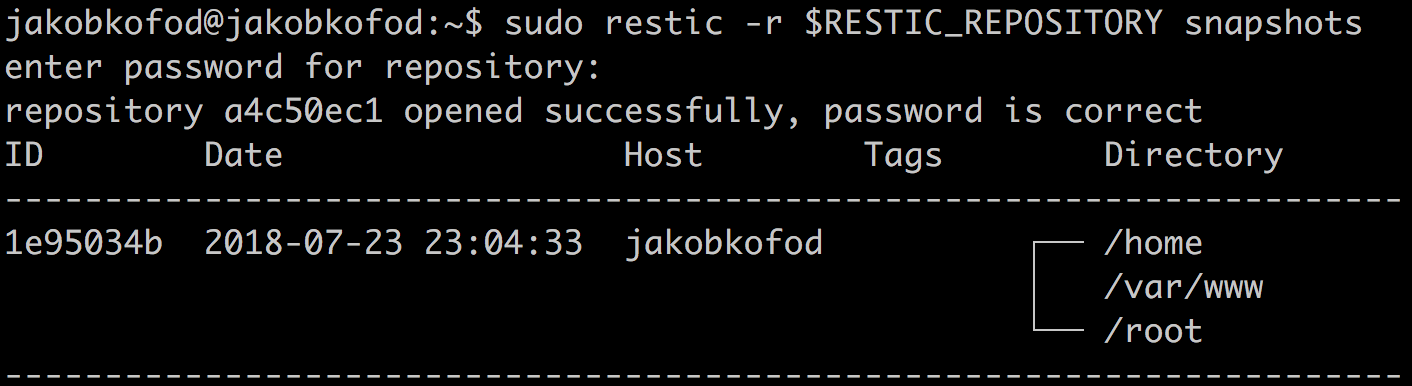
Deleting old backups
Depending on how much space you have available on your Google Drive, we want to set up some policies on how many backups we want to keep.
In this example, we will keep 30 days of backups, but you can change the below number to anything you’d like.
sudo restic -r $RESTIC_REPOSITORY forget --keep-last 30 --pruneAutomating your backups
Here is my very simple shell script that runs every night. It back ups my directories and enforces the policies for old backups.
#!/bin/sh

export RESTIC_REPOSITORY=/mnt/gdrive/restic
export RESTIC_PASSWORD=<your_password>

# Perform restic backup
restic -r $RESTIC_REPOSITORY backup /home /var/www /root

# Keep 30 backups and delete old + prune older snapshots
restic -r $RESTIC_REPOSITORY forget --keep-last 30 --prune
Add a cron job that runs the script at 5 minutes past midnight every day.
sudo crontab -e05 00 * * * /home/backups/backup.shEnsure that your script is executable by running below command. Otherwise the cron job will not run as expected.
chmod +x /home/backups/backup.shFinal words
restic is incredibly robust and reliable. The possibilites are endless. It would not require much configuration to perform hot backups of a MySQL database which can be sent to a Google Drive along with the before mentioned folders.
Let me know how you work with restic! I would love to hear if this tutorial has helped you in any way!
Leave a comment 🙂